Hardening OpenWrt
For a few reasons I've fallen down the OpenWrt hole again of late.
While working on some custom builds, I noticed some areas where I could improve the security of my devices significantly. To be honest, I'm a little surprised that OpenWrt doesn't do some of them by default.
We'll walk through various methods that most people can use to harden their OpenWrt install.
This guide assumes you know how to either SSH into your router or access the Luci web interface, as well as install packages using opkg or the System -> Software menu. If you don't know how to do these things, simply read the OpenWrt quick start.
When installing Luci applications (any package with a name starting with luci-app-), you may need to logout and log back in if the expected menu entries don't show up at first.
Restrict SSH access to the local network (LAN)§
First things first, let's lockdown the SSH server (OpenWrt uses "dropbear" by default) so that it only listens on local network. By default, it listens on all interfaces, which includes the WAN/internet interface. This means that anyone on the web could potentially log into your router if they knew your IP address. They'd likely have to brute force your admin password (you did set one right?), unless you locked down the SSH server to use public key authentication.
Regardless, I don't want to given the public internet the option of logging into my device. I have no personal need to access my router when I'm away from home, so let's shut it down entirely.
Note: The OpenWrt firewall does not open the SSH ports in the WAN zone by default, so the risk is low here. But this extra layer of security never hurts.
Method 1 (uci)§
- SSH into your router (likely something like
ssh root@192.168.1.1) - Type the following to configure dropbear to only listen on the local lan:
uci set dropbear.@dropbear[0].Interface="lan"
uci commit dropbear
service dropbear restart
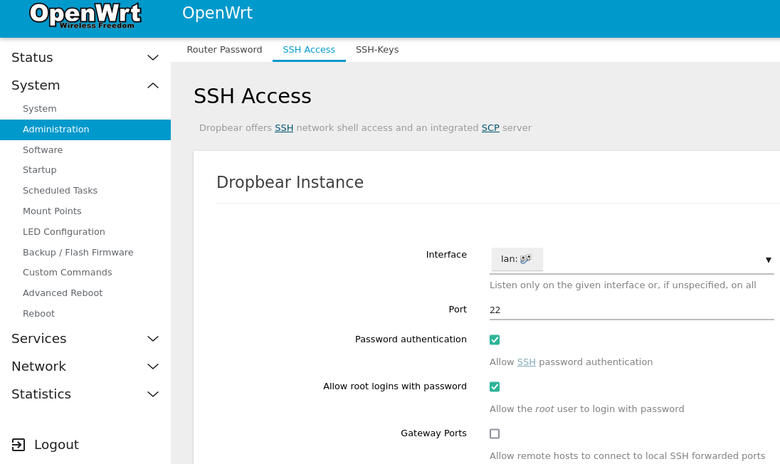
Method 2 (Luci)§
- Login to Luci (open your browser and go to
http://192.168.1.1, enter your password) - Navigate to
System -> Administration -> SSH Access. - Select
LANfrom theInterfacemenu. - Click
Save and Apply. - Go to
System -> Startupand click theRestartbutton next to dropbear. - Note: Luci may actually restart dropbear for us, so this last step might be unnecessary.
Restrict Luci/uhttpd access to the local network, access over HTTPS.§
Just like SSH/dropbear, the Luci web interface (uhttpd server) exposes itself to the public web by default.
Assuming you have no need to login to your router when away from home, let's lock it down to only be accessible on the local network.
Note: The OpenWrt firewall does not open the HTTP/HTTPS ports in the WAN zone by default, so the risk is low here. But this extra layer of security never hurts.
OpenWrt Wiki reference for 'Securing uHTTPd'
Method 1 (uci)§
Listen to local LAN IPs and enable HTTP to HTTPS redirects.
. /lib/functions/network.sh

# Load the list of ipv4/ipv6 addresses into local variables for easily handling.
network_get_ipaddrs ip4addrs 'lan'
network_get_ipaddrs6 ip6addrs 'lan'

uci delete uhttpd.main.listen_http
uci delete uhttpd.main.listen_https

for ip4 in $ip4addrs; do
    uci add_list uhttpd.main.listen_http="$ip4:80"
    uci add_list uhttpd.main.listen_https="$ip4:443"
done

for ip6 in $ip6addrs; do
    # Only add the link local/ULA IPV6 address, which starts with an 'f'
    if [ -n "$(echo "$ip6" | grep '^f')" ]; then
        echo "$ip6 starts with f"
        uci add_list uhttpd.main.listen_http="[$ip6]:80"
        uci add_list uhttpd.main.listen_https="[$ip6]:443"
    fi
done

# (Optional) Ensure that we use/redirect to HTTPS always
uci set uhttpd.main.redirect_https='1'

uci commit uhttpd

service uhttpd restart
service uhttpd enable
Note: This sets up the uhttpd to listen on the link-local/ULA IPV6 address as well. The OpenWrt documentation (linked above) suggests disabling the IPV6 address completely.
Do whatever suits your preferences. Listening to the local IPV6 address doesn't seem like a risk to me. Listening to the global IPV6 address would be more of a concern but we're not doing that here.
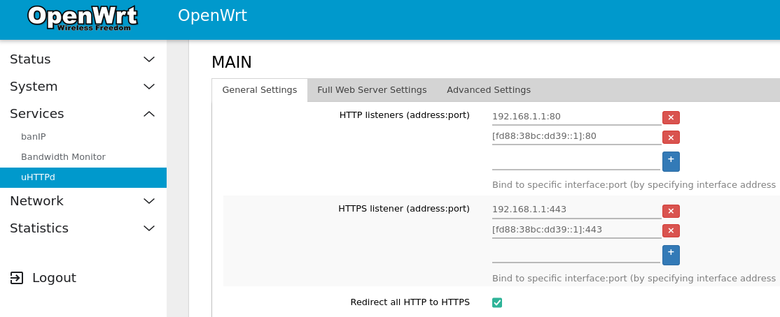
Method 2 (Luci)§
- Install the
luci-app-uhttpdpackage. - Go to
Services -> uHTTPdpage. - Fill in the HTTP and HTTPS listener sections with IPv4 and IPv6 addresses.
- You can set the IPv4 address to just
192.168.1.1or whatever you've configured your router's LAN IP to be. - Make sure to use brackets to surround the IPv6 addresses and add the port number at the end, like
[fd88:38bc:dd39::1]:443.
- You can set the IPv4 address to just
- (Optional) Click the
Redirect all HTTP to HTTPScheckbox if you want to use HTTPS with a self-signed certificate. - Click
Save and Apply.
BCP38§
This is less about protecting your router and more about preventing your network's contribution to some types of DoS/DDoS attack.
For more info I highly recommend the BCP38 info website which explains the root problem quite well.
Method 1 (uci)§
- Install the
bcp38package. - Run the following
ucicommands
uci set bcp38.@bcp38[0].enabled='1'
uci set bcp38.@bcp38[0].interface='wan' #Adjust to match your WAN port - may be something like eth0.2 for example.
uci commit bcp38

service bcp38 restart
service bcp38 enable
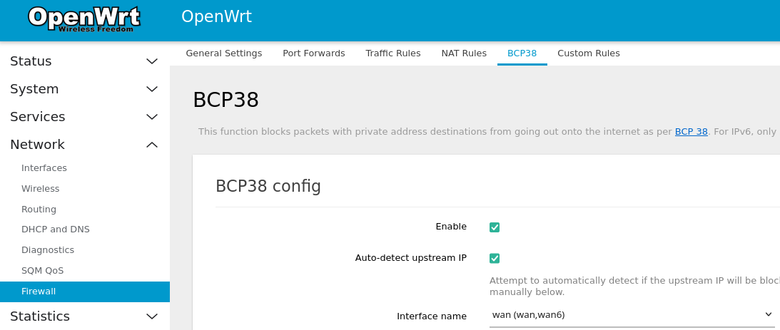
Method 2 (Luci)§
- Install the
luci-app-bcp38package. - Navigate to
Network -> Firewall -> BCP38. - Click the checkbox to enable.
- Select the interfaces that pertains to your WAN (likely labeled
wan,wan6). - Click
Save and Apply.
banIP§
It's highly recommended to install and configure banIP using Luci as the core configuration is a little verbose when done from the commandline. I say that, but I've been configuring it from the commandline for a while now, so feel free to copy-paste my configuration below - it should work well.
Note: This package recommends that your router has at least 128MB of RAM.
banIP project page/documentation banIP Support Thread
Method 1 (uci)§
- Install the
banippackage. - Enable, and configure a core set of blocklists:
uci set banip.global.ban_enabled='1'
uci set banip.global.ban_trigger='wan' #Configure to your proper WAN interface, eg. 'eth0.2' or 'wan'
uci delete banip.global.ban_sources
uci add_list banip.global.ban_sources='darklist'
uci add_list banip.global.ban_sources='debl'
uci add_list banip.global.ban_sources='drop'
uci add_list banip.global.ban_sources='feodo'
uci add_list banip.global.ban_sources='firehol1'
uci add_list banip.global.ban_sources='greensnow'
uci add_list banip.global.ban_sources='iblockads'
uci add_list banip.global.ban_sources='iblockspy'
uci add_list banip.global.ban_sources='myip'
uci add_list banip.global.ban_sources='nixspam'
uci add_list banip.global.ban_sources='proxy'
uci add_list banip.global.ban_sources='sslbl'
uci add_list banip.global.ban_sources='talos'
uci add_list banip.global.ban_sources='threat'
uci add_list banip.global.ban_sources='tor'
uci add_list banip.global.ban_sources='uceprotect1'
uci add_list banip.global.ban_sources='yoyo'

# Allowlist a few sites that I've seen some blocklists break before.
echo "enro.com" >> /etc/banip/banip.whitelist
echo "www.reddit.com" >> /etc/banip/banip.whitelist
echo "yelp.com" >> /etc/banip/banip.whitelist

uci commit banip

service banip restart
service banip enable
This enables banIP with a set of blocklists that I recommend. The iblockads and yoyo lists specifically target ads, and may be redundant depending on your networking setup (like if you're running PiHole or AdguardHome), but they can help regardless. I have seen some false positives come out of iblockads so be sure to use the whitelist functionality if you notice any breakages, or just disable its use completely.
Bonus - setup cronjob to refresh blocklists§
I recommend refreshing the blocklists every 24 hours. Here's an example of how to configure a cronjob to run once a day:
crontab - <<EOF
15 07 * * * /etc/init.d/banip reload
EOF
NOTE: This OVERWRITES your existing crontab. If you already have other cronjobs, either edit the crontab manually or add them to this command as appropriate.
Method 2 (Luci)§
- Install
luci-app-banip. - Navigate to
Services -> banIP. - You can leave most settings at default (banIP autodetection is pretty good), but you'll need to both enable banIP and configure blocklists directly.
- Enable banIP - just check the
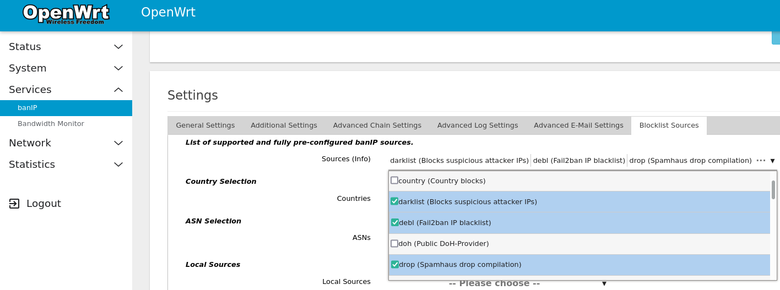
Enabledbox on theGeneral Settingstab. - Configure blocklists - go to the
Blocklist Sourcestab and use theSourcestab to select your desired lists. You can see an example of the lists I personally use in the command used in Method 1 above. - Click
Save and Apply.
Enabling banIP:

Configuring blocklists:
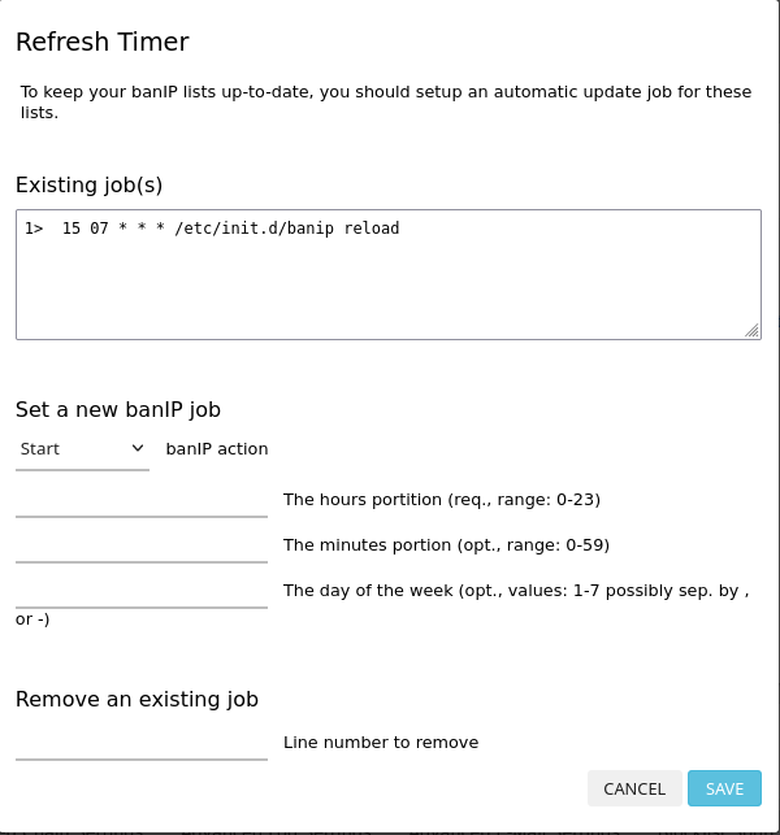
Bonus - setup cronjob to refresh blocklists§
Just like Method 1, its possible to setup a cronjob to refresh the blocklists.
- Click
Refresh Timerbutton on the main status page. - Set the action to
reload(not "refresh", confusing I know...) - Pick an hour in the 0-23 time range that works for you.
Here's an example of my own configuration:
Disable or remove UPNP§
If you aren't using UPNP (a service to automatically punch holes in your firewall...), you should disable it completely, and/or remove the package completely.
- Navigate to
Services -> UPnP. - Uncheck the
Start UPnP and NAT-PMP servicecheckbox. - Save and Apply.
- (Optional) Navigate to
System -> Startupand stop + disable theupnp(orminiupnp) service. - (Optional) Remove the package completely using the
System -> Softwaremenu oropkg --autoremove remove luci-app-upnp
Firewall DROP external connections§
By default the OpenWrt firewall configuration is kinda "noisy" in how it rejects traffic from the global internet.
You can see this in action by using Steve Gibson's ShieldsUP tool. Click on the Proceed buton and then use the Common Ports or All Service Ports buttons to scan your whole router. The buttons are kind of hard to see, I admit, but they should be there.
Let's configure the firewall to silently drop all external connections instead of gracefully telling them "no thank you".
Method 1 (uci)§
# Note: I'M ASSUMING THAT THE LAST ZONE IS THE WAN ZONE. THIS BREAKS IF THE WAN ZONE IS ON A DIFFERENT ZONE NUMBER.

# A little safety check - only try and set the input DROP on WAN. Skip/bail if the last interface isn't the WAN.
if [ $(uci get firewall.@zone[-1].name) = 'wan' ]; then
    echo 'Locking down firewall'
    uci set firewall.@zone[-1].input='DROP'
    uci set firewall.@zone[-1].forward='DROP'

    uci commit firewall

    service firewall restart
fi
Method 2 (Luci)§
- Navigate to
Network -> Firewall. - Under
Zones, set thewan => REJECTzone todrop(instead of the defaultreject) on bothInputandForwardusing the associated dropdowns. - Click
Save and Apply.

Conclusion§
Hopefully this helps secure your home router just a little bit more. OpenWrt is already significantly more secure than the standard firmware that ships from the factory for most routers, but these tweaks should lock it down to the utmost degree.
A few other references that may be helpful: