OpenWRT Router Setup
Since it's 2020, I have an abundance of free time on weekends, and a buddy of mine kept (rightfully) bugging me to write up a post on my router setup, I finally got around to doing so.
Let's dive in on my home router setup, including firmware, QoS, and the beginnings of ad blocking.
Prelaunch§
Before I get started, perhaps I should explain why I run a custom router firmware, and why you may want to as well.
- Security
- The upside to running a firmware like OpenWRT is that I get much more up-to-date code than what ships with the router. Router manufacturers rarely support their router firmware longer than a year or so, so by using something like OpenWRT I recieve regular updates, which is paramount for network security. Also, by flashing my own firmware, I know exactly what's running on the device, instead of potential malware.
- If you don't believe me, here's just one example of modern routers being sold on Walmart and Amazon that contain backdoors: Cybernews.com
- Performance
- OpenWRT was one of the first operating systems to support bufferbloat mitigation technologies like fq_codel, "cake", etc. It's a long story, but the creators of this cutting edge QoS technology created a custom fork of OpenWRT (CeroWrt) for research purposes. As their research bore fruit, they published their work upstream into the core OpenWRT project. This technology is truly amazing in its ability to reduce or eliminate severe latency on a loaded network connection, and could stand on its own as the sole reason to run OpenWRT.
- Ad Blocking
- While Pihole is all the rage (I prefer, and have contributed to, Adguard Home instead), you can get pretty dang before when it comes to blocking ads across your entire network with some of the facilities available in OpenWRT. Off the cuff, I know of three different methods of blocking ads network wide with OpenWRT, and we'll cover one today.
- Because it's fun!
- Let's face it, if you're reading this blog, you're likely a fellow nerd (said with affection). Hacking away on your own device gives a strong sense of accomplishment and a feeling like you really own something.
Launch§
Okay, first things first - you'll want to install OpenWRT on your device.
There's a few methods for doing this, and I'm just going to refer you to the OpenWRT website, which has a Quick Start guide for taking an existing router with stock firmware and installing OpenWRT.
The TL;DR version:
- Make sure your device is supported by OpenWRT.
- Boot your router, login to the admin page (generally found at
http://192.168.0.1orhttp://192.168.1.1).- If you don't know the username/password (if it prompts you), do an internet search for the brand, as they often use standard credentials like
admin/adminorroot/adminfor the username and password combo. You may be able to find it written on your router near the serial number as well.
- If you don't know the username/password (if it prompts you), do an internet search for the brand, as they often use standard credentials like
- Find the firmware upgrade button, and select the
*-factory.binfirmware image you presumably downloaded.- I have a few routers (don't judge), so using the TP-Link Archer C7 v2 as an example, I'd upload the openwrt-19.07.4-ath79-generic-tplink_archer-c7-v2-squashfs-factory.bin as an example.
- Note: One particular quirk I ran into with this router (funny story actually...) is that the company made a few regionalized models, separate from their global models. These are region locked, and require uploading the correct US/EU version when doing the initial flash.
- Wait for the router to reboot (this can take a while, so be sure to give it 5-10 minutes before you assume you've failed).
- Reset your network (unplug/replug your wired cable, assuming you used one).
- Login to the admin page at
192.168.1.1. Just type that into your browser and go.- If your browser tries to get smart with you and perform a web search with that address instead, look for the little prompt that says "did you actually mean to go to 192.168.1.1?". Yes I did, you cheaky bastard of a browser...
There's loads of tutorials, Youtube videos, etc about doing this particular song and dance. I recommend you start searching if you want more information or better tutorials.
Configuration§
Okay, now that you've got the guts installed, let's get configuring the cool stuff.
Root password§
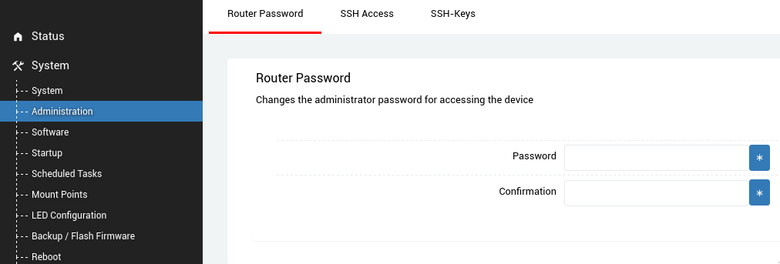
When you initially login, you'll see a prompt with the username root and an empty password box. Simply click Login the first time, since an administrative password hasn't been set. You'll want to set one, for obvious security reasons.
You can change it under System -> Administration -> Router Password.
Wireless§
Not all routers actually have wireless radios, but assuming yours does (and you want to use it), you can get started creating your wireless network by navigating to Network -> Wireless.
If you're running a modern router, you likely have two radios (one for 802.11n and one for 802.11ac).
Simply click the Edit button for each and fill in details like the (E)SSID (your wireless network name), set the Wireless Security Encryption to WPA2-PSK (strong security), and pick a decent password for the Key.
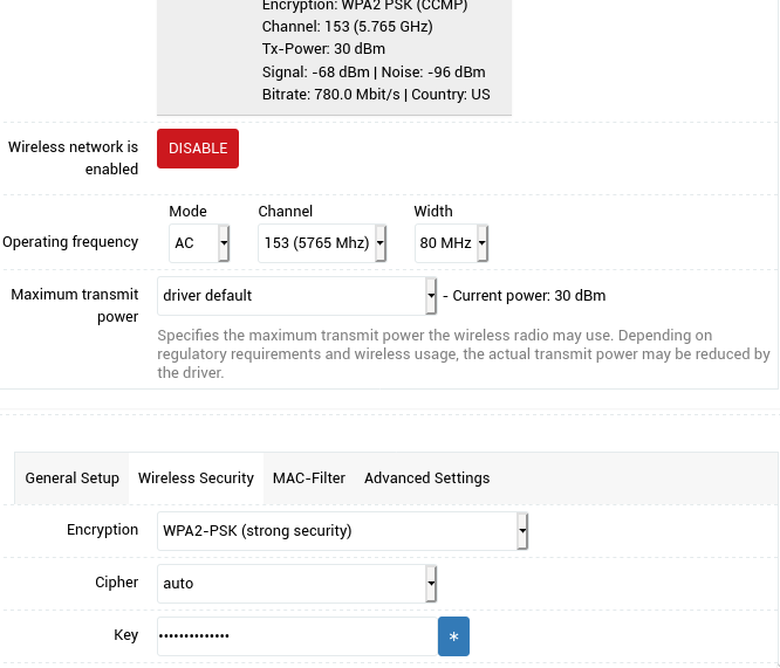
You may want to experiment with the Channel and Width options over time as well. Generally, the greater the Width, the better your speeds will be, but this depends on the router and what the devices on your network support. Generally you'll have better compatibility with a smaller Width (like 20-40 MHz), but you may be sacrificing some speed. TBH, you probably won't even notice...
The Channel option is a little more tricky. When in doubt, leave it at default. Maybe try auto (although I've had some routers just straight fail to spin up the radio on auto...). The best approach is to use an app like Wifi Analyzer (Android) to map out the channels being used by your neighbors. You'll want to aim for a less congested channel.
Also, channels can overlap a bit (you'll see that in the graphs generated by Wifi Analyzer), so it's recommended to pick something that's ~3 (or more) channels away from another channel, if you can. In general aim for the largest gap in channels, and hope for the best.
This is more of a problem on 2.4Ghz networks, since 5Ghz networks have access to a lot more channels.
Again, if you're unsure about any of this, simply stick with the defaults for now. You can always change it later.
Firewall§
For a little extra security, you can use this trick to "hide" your router from the public internet. To be fair, it's not really hiding, but simply acts as a deterent to anyone running port scans on the open internet.
- Run a "ShieldsUP" check against your current router configuration, courtesy of Steve Gibson
- Navigate to
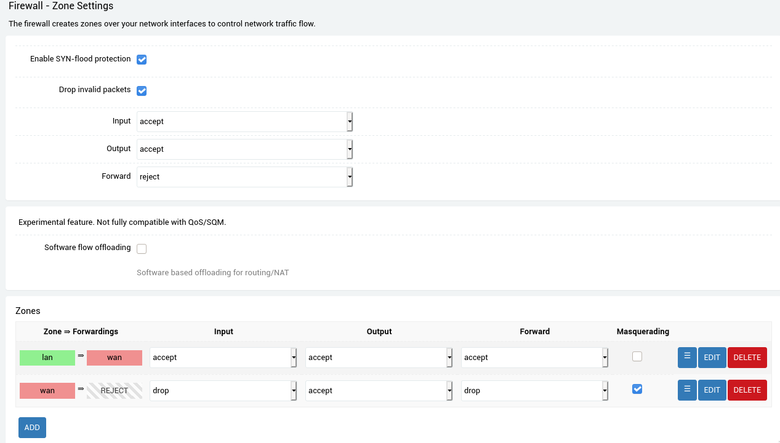
Network->Firewall->General Settings - Under the
Zonessection, change therejectvalue todropfor theInputandForwardcolumns of thewan => REJECTrow. See the screenshot below for reference. - Run the "ShieldsUP" scan again, which should show that your "equipment actively rejected our UPnP probes!".
- Rejoice.
SQM (aka the bufferbloat killer...)§
For this next part, you'll want to install the SQM package. You can either do so from the Web UI, or if you want to go commando-line (heh), then you can SSH to your router via ssh root@192.168.1.1. The password is whatever you set on the Router Password page beforehand.
Command line install of SQM§
Nice and easy:
# opkg update
# opkg install luci-app-sqm
Note that I'm installing luci-app-sqm, as that brings in the core SQM dependencies AND a useful widget in the Web UI. If you're hardcore and don't want to use the Web UI at all, then just install the sqm-scripts package.
But if you're that hardcore, you probably already knew to do that... why are you reading this blog??
Web UI install of SQM§
- Navigate to
System->Software. - Using the
Filterfield, typeluci-app-sqm. - It should show up as the top result, so click the
Installbutton and wait. - It can take a minute, but if the screen seems to have frozen while waiting for the install, chances are you're fine and the install finished, so simply reload the page.
Setting up SQM§
Note: I have a DOCSIS (cable) modem to connect to my ISP (Charter). Depending on your connection, you may want to change a few of these settings. I recommend reading the linked references.
After installing the luci-app-sqm package, and rebooting, log back in and go to Network -> SQM QoS
- Check the box to enable this SQM instance.
- From the dropdown, select your WAN interface (aka, the interface that connects to the public internet, NOT your local LAN). If you open the list, chances are you'll see an interface with
(wan,wan6)tacked on the end. This is what you want. - Set the download speed/upload speed accordingly.
- This will require trial and error, I recommend testing using a good speed test tool (make sure you convert the value to kilobits/s, which is what this tool takes).
- If you're on Arch Linux/Manjaro/etc, I recommend installing
ookla-speedtest-binfrom the AUR, and running your speedtest like so:speedtest -u kbps - You'll want to set these values to someting like 90% of the tested rate to start, but then after doing the later tweaks, you can run tests to bring these closer to 95% or even 99% of rated speeds.
- For my 100 megabit connection from Charter, I use:
111000for download and11100for upload on my WRT3200ACM, but I have to tune those down to110000and10000respectively on my Archer C7, since it's not powerful enough to handle the higher bandwidth settings without spiking the latency by 200ms in the first few packets. - You can test your optimal settings by running a ping (
ping 1.1.1.1) in one terminal and then a speedtest (speedtest -u kbps) in another. - If the ping spikes significantly while running your speedtest (really noticeable when doing uploads), then you'll need to adjust your settings to more conservative values. If you want an idea of what's bad, simply run this test with SQM off - you'll likely see your ping times pike into the 100's of milliseconds (which is insane).
- Reference - short version: https://openwrt.org/docs/guide-user/network/traffic-shaping/sqm
- Reference - long (and very interesting) version: https://openwrt.org/docs/guide-user/network/traffic-shaping/sqm-details
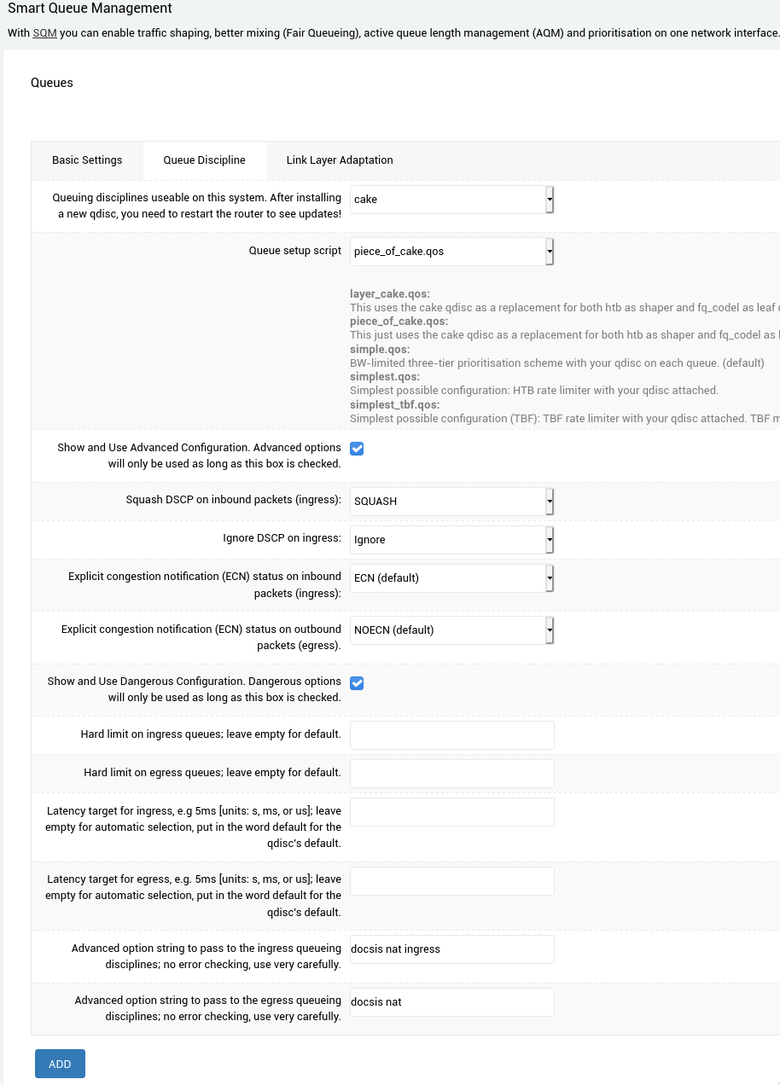
- Set the Queue discipline to
cake. - Set the Queue setup script to
piece_of_cake. - Check the
Show and use dangerous configurationcheckbox. - Set the
Explicit congestion controltoECNforingress. - Set the
Explicit congestion controltoNOECNforegress. - Under the
Advanced option...for ingress queueingoption, setdocsis nat ingress - Under the
Advanced option...for egress queueingoption, setdocsis nat- If your up/down bandwidth is greater than or equal to 1x15, you can experiment with adding
ack-filterto your egress options. - Reference: https://www.reddit.com/r/HomeNetworking/comments/fvhr4w/psa_sqm_cake_nat_and_bufferbloat_tuning/
- You can read more about these advanced options at the following man page: https://man7.org/linux/man-pages/man8/tc-cake.8.html
- If your up/down bandwidth is greater than or equal to 1x15, you can experiment with adding
- Both of these are assuming you're using a cable (DOCSIS) modem.
- IF you aren't using the
docsisqueue option above THEN do the following, otherwise set the link layer adaptation tonone(because you're already adapting for it): - Under Link Layer Adaptation, set the Link Layer to
Ethernet with overheadif using a cable modem (which I am). - Much more information can be found here: https://openwrt.org/docs/guide-user/network/traffic-shaping/sqm-details#making_cake_sing_and_dance_on_a_tight_rope_without_a_safety_net_aka_advanced_features
- Set the Per Packet Overhead to 18 (or 22, seems to be some discrepancy in recommendations).
Encrypted DNS (with optional ad blocking)§
I'm a big fan of privacy. I'm also a big fan of ad blocking, which generally improves privacy, security, AND performance. One hell of a trifecta.
With that in mind, I wanted to give my brother all of these benefits, without the hastle of dealing with adblock lists, special admin pages on the router, etc.
To be fair, I do this (via an instance of Adguard Home, installed on my router), as I like to have complete control and reap the performance benefits of having an adblocker running directly on my local router. I'll write a proper blog post about that setup another time...
But, this just didn't make sense for my brother's use case. So in order to give my brother the benefits of encrypted DNS while also allowing myself to remotely turn on ad blocking if he desires, I set him up with the following:
- A profile on my NextDNS account.
- Even if you aren't using their ad blocking functionality, I think that NextDNS is a fanastic service. They provide high speed DNS servers, encrypted traffic support, optional (!!) metrics/logs, and of course - incredibly comprehensive filtering capabilities, with blocking for everything from ads to malware to social media.
- Plus, their privacy policy is just incredible and I think sets the standard that other companies should be held against.
- They're primary service is free for 300,000 queries/month. Because I love their service, I go ahead and throw $2 their way a month. Since I pay for their "Pro" plan, if I spill over 300,000 DNS queries a month, then I don't lose ad blocking support for the remainder of the month.
- An instance of
dnscrypt-proxy(2), running on the router.
This combination allows for strong DNS traffic encryption, blocking via NextDNS, and local device resolution via the onboard dnsmasq instance that comes with OpenWRT.
So, without further ado, let's get started.
Installing dnscrypt-proxy 2§
Luckily, this is quite easy these days, ever since they added an official package to the OpenWRT repos.
The dnscrypt-proxy wiki has detailed instructions.
In short:
- Update your software lists from either the UI (
System->Software->Update lists...) or an SSH instance (opkg update). - Install
dnscrypt-proxy2, just like you did withluci-app-sqmabove. - Go to
Network->DHCP and DNS->General Settings->DNS forwardings, and add127.0.0.53.- This tells the running
dnsmasqinstance to point to thednscrypt-proxyinstance for DNS resolution, instead of using your ISP's servers.
- This tells the running
- Save & Apply.
Configuring dnscrypt-proxy 2§
Now, before we restart dnsmasq to get the changes to take effect, let's update dnscrypt-proxy to point to our NextDNS instances.
You need to SSH into your router to do so. If you know what SSH is, you probably know how to do it (ssh root@192.168.1.1...)
Once you've logged in, you'll want to edit the /etc/dnscrypt-proxy2/dnscrypt-proxy.toml file. Chances are your OpenWRT install has either nano or a stripped down verison of vim installed. Pick your favorite editor.
In this case, I used vim:
vim /etc/dnscrypt-proxy2/dnscrypt-proxy.toml
Point to NextDNS§
Scroll to the very bottom, you'll see a section for Static entries.
If you're using NextDNS, login to your account, select the profile you want to use, and then scroll down in the installation instructions, and you'll see an generated config for DNSCrypt support.
Here's an example of my own after I updated it to point to my NextDNS profile:
...
########################################
#            Static entries            #
########################################

## Optional, local, static list of additional servers
## Mostly useful for testing your own servers.

[static]

  [static.'NextDNS-BroRouter']
  stamp = 'sdns://AgEAAAAAAAAACImaBunchOgiBberish...'
Scroll back up to the top of the file, and uncomment and update the server_names entry to point to your new NextDNS record.
...
server_names = ['NextDNS-BroRouter']
...
You could stop right there. I updated a bit more of the config, out of some old lesson's I'd learned over the years.
IPv6§
First, if you have an IPv6 connection, you'll want to able the ipv6_servers option. You can tell if you have IPv6 in OpenWRT by viewing your WAN6 interface - if it's up and sending/recieving packets, you have IPv6 configured on the modem and the router.
So, find the ipv6_servers option, and set it to true (it's likely false by default).
Blacklist§
Lastly, if you're going to be using NextDNS for ad blocking/domain filtering, I recommend disabling the default blacklist file that dnscrypt-proxy comes with.
To do that, find the [blacklist] section.
Under that, you should see an entry for blacklist_file. Simply comment it out, like so:
[blacklist]

  ## Path to the file of blocking rules (absolute, or relative to the same directory as the...
#blacklist_file = 'blacklist.txt'
This will prevent dnscrypt-proxy from doing any of its own filtering on box. While this might sound advantageous at first, if you're using NextDNS to configure your filters, you don't want an extra set of filtering rules running on your router that might conflict with your downstream settings. Trust me, this is confusing as hell when you run into it, took me a little while to figure out why certain websites were't working that should have been.
Caching§
You don't have to do anything!
Older versions of dnscrypt-proxy ran with less-than-optimal caching settings, but the author conducted some interesting research, found pretty optimal settings, and set those as the defaults in dnscrypt-proxy.toml. You can scroll down to the caching section to get an idea of what they are, if you're curious.
See also: https://github.com/DNSCrypt/dnscrypt-proxy/wiki/Caching
Otherwise, just rest easy and enjoy blazing fast caching.
Restart dnsmasq§
Restart dnsmasq.
System -> Startup...
Conclusion§
Whoo! This was a long post. I hope this helped you in some way, as it's been a collection of techniques that I've used on my own routers in one way shape or form, and I don't think there's any other place on the internet that has all of this in one place.
Go forth, have awesome internet, and prosper!